My Boots

Boots

Last week while backpacking in the Mount Jefferson Wilderness area, I had a sad incident related to my boots.  There was a stream crossing, but the stream wasn’t running too high, so I just walked right across.  Boy#1 and Boy#2 were with me and neither had waterproof footwear so I went back and carried their packs across so that they could lightly hop across on rocks without wetting their feet.  By then some of the other boys in the party had caught up and I ended up carrying over another three or four packs.  I got my pack on again and started hiking again, and then I noticed that my right little toe was damp.  The seal failed and my boots are no longer waterproof.  It is time to buy new boots.

My boots were purchased back in the late 1990’s, so it’s been awhile since I’ve had to select new boots.  I’ve been thinking about some of the attributes I like about my boots.  In no particular order:

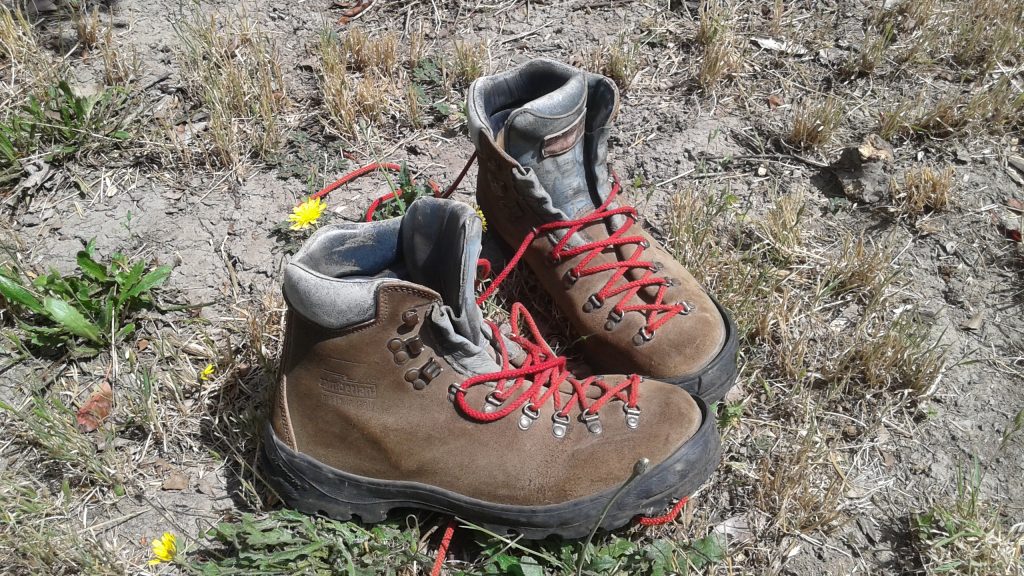
  • Vibram soles – The soles are worn such that the writing is no longer legible on the yellow emblem, but there is still tread.  I rarely wore my boots on man made surfaces which I think contributed to their longevity.  I always had the traction I needed.
  • Waterproof – as long as the water didn’t go above the top, my feet were dry.  The leather upper and integrated one piece tongue are joined so that there are no gaps in the outside barrier.  It was nice to be able to tromp right through water without worrying about wet feet.
  • Step-in crampon friendly – I’ve never done enough mountaineering to justify fancy plastic shell boots, but being able to quickly slap on some crampons for an ascent has been nice.
  • Sturdy lacing system – I’ve got skinny feet, so I really need to be able to tighten things down.  One of the original laces broke back in 2000 while hiking in Rocky Mountain National Park, but I found a store in Estes Park that sold shoe laces by the foot; I took off the unbroken lace and bought new laces in classic red.
  • Smooth lining – With my bony heels, I tend to wear through the back of shoes before anything else.  The smooth lining slowed that wear significantly and also helped to avoid blisters.
  • Ankle support – The boot came up high enough that it gave great ankle support.  The smooth padding allowed me to have the ankle be tight but still comfortable.
  • Classic – My boots have the classic, Italian style look of a hiking boot.  They are simple, honest boots.

I’m sad that it’s time to retire my boots–I’ve had many adventures with them on my feet.  I’m also excited to find new boots and have some new adventures.


My New Toy (Part 2)

In the previous post, I implemented a simple counter with serial output and today I improved it.  The main reason I purchased the ESP8266 module in the first place was to get WiFi for cheap, so I wanted to try out the WiFi capabilities.  The resulting sketch is still a counter, but instead of publishing the count via the serial interface, it connects wirelessly to a database and publishes the count there.

To begin with, I needed a simple database that I could access via HTTP.  Redis is a simple key/value type database, but it doesn’t have an HTTP interface.  I found Webdis “A fast HTTP interface for Redis”.  To set things up quickly, I found that someone had already put everything together and published a Docker image on DockerHub.  So, through the magic of Docker, all I had to do to get Redis and Webdis up and running on my computer was run this magic command:

docker run -d -p 7379:7379 -e LOCAL_REDIS=true anapsix/webdis

I then wrote a sketch that would publish to my new database:

#include <ESP8266WiFi.h>
const char* ssid = "name of wifi network";
const char* pass = "wifi network password";
const char* ip = "192.168.1.35";
const int port = 7379;
int count = 0;

void setup() {
  WiFi.begin(ssid, pass);
  while (WiFi.status() != WL_CONNECTED) {
    delay(1000);
  }
}

void loop() {
  delay(5000);
  WiFiClient client;
  client.connect(ip, port);
  String url = String("/SET/count/") + count++;
  client.print(String("GET ") + url + " HTTP/1.1\r\n" +
               "Host: " + String(ip) + "\r\n" + 
               "Connection: close\r\n" + 
               "Content-Length: 0\r\n" + 
               "\r\n");
}

Basically, it connects to the wifi network (ssid) using the provided password (pass) and then publishes the count to the database (located at ip).  It publishes the new count value every five seconds.

To verify that it was working, I simply plugged this URL into my web browser :

192.168.1.35.7379/GET/count

It returns the current value of count:
getCount

So now I can not only program my new toy, but also use some of its wireless capabilities.  It’s not useful, but it is a good step to learning how to use the ESP8266.

My New Toy (Part 1)

Today my new toy arrived.  It’s an ESP8266 IOT WiFi Module.

ESP8622

Specifically I selected the “Elecrow ESP8266 IOT Board WiFi Module with Built in USB and Battery Charging” out of the many ESP8266 variants because of the following features:

  • Onboard USB (I find it easier than FTDI)
  • NOT breadboard friendly (Pins sticking up not down)
  • In stock and eligible for Prime shipping

To start with, I just wanted to verify that I could run some code on it.  Here’s what I did:

  1. Installed the Arduino IDE from https://www.arduino.cc/en/Main/Software.  I used the latest available (1.6.9).
  2. Configured the Arduino IDE to support ESP8266 boards:
    1. Opened up the preferences and added http://arduino.esp8266.com/versions/2.3.0/package_esp8266com_index.json to the “Additional Boards Manager URLs”.
    2. Opened the “Boards Manager”, found the “esp8266” listing, and clicked the “Install” button (using the latest 2.3.0 version).
    3. Since there wasn’t a specific Electrow entry, I selected “Generic ESP8266 Module” for the board type.
  3. Wrote some code.  Here is my very simple sketch to slowly count and send the number via serial:
    int count = 0;
     void setup() {
     Serial.begin(9600);
     }
     void loop() {
     Serial.println(count++);
     delay(1000);
     }
  4. Ran the code.  I uploaded it to the module, opened the serial terminal, and saw that it was counting as designed.
    serialTerminal

Of course it took a bit of kicking and swearing to do that.  Here are a few of the things that I did before everything worked:

  1. Ran the Arduino IDE as root
  2. The upload speed is 115200, but the terminal speed is 9600 baud
  3. Change the reset method to “nodemcu”.
  4. Sometimes (but not always) hold the flash button and than hit the reset button before I could successfully upload my sketch.
  5. Switch USB cords (the first is a cheap, old cord that in recent years has only been used for charging devices).
  6. Check the port whenever I plugged in the module (it sometimes switched between /dev/ttyUSB0 and /dev/ttyUSB1 just to spite me).

There’s nothing exciting about my counting program, but by getting it running I confirmed that I can 1) Connect to the module 2) Upload code to it and 3) Run the code.  Now that I can do that, I can see what else I can make my new toy do . . .