Getting local address in Go

Awhile ago I had some tests that would spin up a server and then hit some “localhost:8080” endpoints and verify the responses. The tests worked great in my IDE, but when the tests were invoked as a step during a Docker build, they could not find the server. This post is about how I got my tests to run within a Docker container.

There are a variety of ways to get the local address in a Docker container, but many of the solutions I found online involved running one or more command line utilities and I wanted something that “just worked” in Go. After various kicking and swearing (and searching), this is what I came up with:


package main

import (
    "fmt"
    "net"
    "os"
)

func main() {
    fmt.Println(getLocalAddress())
}

func getLocalAddress() (string, error) {
    var address string
    _, err := os.Stat("/.dockerenv") // 1
    if err == nil {
        conn, err := net.Dial("udp", "8.8.8.8:80") // 2
        if err != nil {
            return address, err
        }
        defer conn.Close()
        address = conn.LocalAddr().(*net.UDPAddr).IP.String() // 3
    } else {
        address = "localhost" // 4
    }
    return address, nil
}

The above is a complete main.go which can be compiled and ran, but the most important piece is the getLocalAddress() function which returns the local address (or an error if something goes wrong, but I haven’t had problems). Here are some of the key points of the code:

  1. Checking if the “/.dockerenv” file exists is an easy way to check if the code is running in a Docker container.
  2. We create a net.Conn instance
  3. I first tried using
    address = conn.LocalAddr().String()
    to get the local IP address, but it included a port that I didn’t want. Instead of doing string manipulation, I found the returned LocalAddr was a pointer to a net.UDPAddr and so a simple casting provided easy access to the IP.
  4. If not running in Docker, “localhost” is good enough.

And that’s about it. When I have checked, the local IP address of the container has been in the 172.17.0.x range which I believe is a Docker default. Since doing this, there haven’t been any problems running the test, but I’m not sure if this is an industrial strength solution suitable for production environments.

Multistage Docker Builds For Go Services

One thing I like about using Go for services is that it can have a much smaller footprint than other languages. This is particularly useful when building Docker images to run since a Docker container contains everything needed to run a service.

But images sizes can grow quickly. As Go code gets more complicated you can and up with a large number of dependencies and tests. Sometimes additional tools are needed as part of the build process such as for code generation. I also like to have various tools available when debugging build problems. But you can have all of that and still end up with small image by using multistage builds in Docker.

Multistage builds were added to Docker a couple of years ago and work very well. I will refer interested parties to the official documentation, but one issue I have encountered as I have used multistage builds is that sometimes the Go executable I create in a penultimate stage does not execute properly in the image created in the final stage. Typically the reason for this is because I use Ubuntu based images for building (Ubuntu is the Linux flavor I’m most comfortable using) and prefer Alpine based images for the final package to reduce size. So this is perhaps a problem of my own making, but I have found solutions to the common errors I see.

FROM golang:latest as builder 

# Generic code to copy, compile and run unit tests
WORKDIR /src
COPY src/ ./
RUN go test -v


FROM alpine:latest

WORKDIR /root/

# If you don't adde the certificates you get an error like:
# x509: failed to load system roots and no roots provided
RUN apk --no-cache add ca-certificates

# Because musl and glibc are compatible we can link and fix
# the missing dependencies.  Without this we get an error like:
# sh: ./main: not found
RUN mkdir /lib64 && ln -s /lib/libc.musl-x86_64.so.1 /lib64/ld-linux-x86-64.so.2

# Copy the go exec from the builder
COPY --from=builder /go/bin/main .

CMD [ "./main" ]

The above Dockerfile is a generic multistage build of a “main” go application. Here are couple things of note:
– The “RUN apk –no-cache add ca-certificates” snippet is necessary to avoid “x509” errors.
– The “RUN mkdir /lib64 && ln -s /lib/libc.musl-x86_64.so.1 /lib64/ld-linux-x86-64.so.2” snippet is a bit of a hack to get around the glibc vs musl in Ubuntu vs Alpine. Without it, you get unhelpful, difficult-to-debug errors like “sh: ./main: not found”.

An alternative to the library linking above is to instead set flags when compiling in Ubuntu like “CGO_ENABLED=0 GOOS=linux”.

When using multistage Docker builds for Go services, I’ve found the image for the first stage to be several hundred megabytes, but the image produced by the final stage will often be around a dozen megabytes. You can’t even fit a JVM in an image that small let alone a Java based service.

I love it when a plan comes together

After spending a lot of effort and encountering difficulties in creating pieces, I am often pleasantly surprised when the pieces come together quickly and easily.  This was the case for my latest home improvement tech project.  In my home, it seems like some areas are warmer than others–I realized that some variance will exist, but I wanted to reduce the overall difference between upstairs and downstairs.

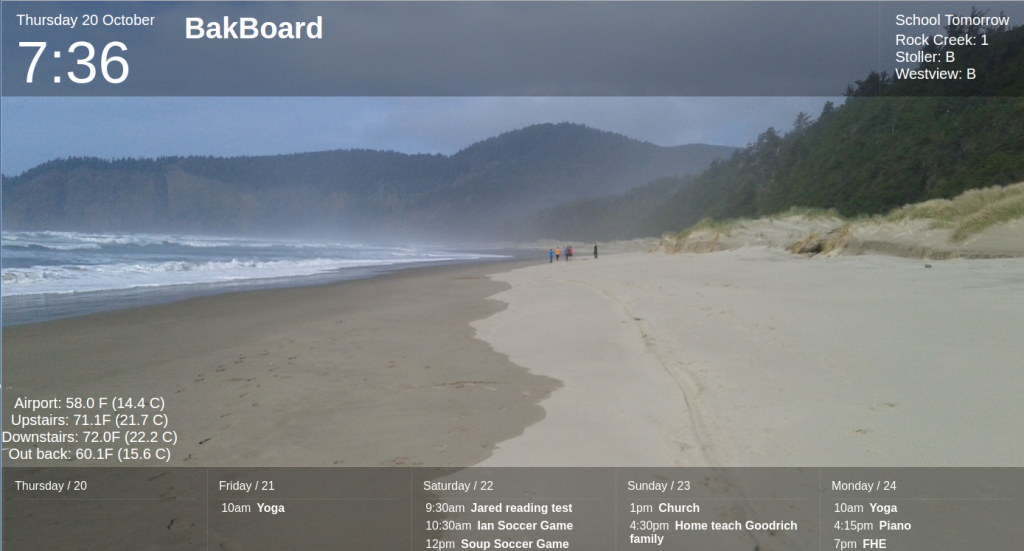
The first step was to be able to measure the temperature or each area.  Thanks to my ESP8266 development boards, I am able to publish the upstairs temperature and publish it to a database and Bakboard.  With the new Nest thermostat and a little playing with the REST API, I was able to do something similar and publish the downstairs temperature to the BakBoard.  There are now four temperatures published on the Bakboard.

temps

I then wrote a simple Java program with that basically does the following:

  1. Get the temperature of the [Downstairs] thermostat
  2. Get the temperature of the [Upstairs] temperature sensor
  3. If the difference between the two temperatures is greater than 2 degrees, turn on the furnace fan

I had a little trouble figuring out how to turn on the fan, but this is the way I implemented it in Java:

public void runFan(String thermostatId, String authToken) throws Exception {
    final String rootUrl = "https://developer-api.nest.com";
    HttpPut httpPut = new HttpPut(String.format("%s/devices/thermostats/%s/fan_timer_active", rootUrl, thermostatId));

    StringEntity putEntity = new StringEntity("true");
    httpPut.setEntity(putEntity);
    httpPut.addHeader("Content-Type", "application/json");
    httpPut.addHeader("Authorization", "Bearer " + authToken);
        
    CloseableHttpClient httpclient = HttpClients.createDefault();
    try {
        CloseableHttpResponse response = httpclient.execute(httpPut);
            
        // We need to handle redirect
        if (response.getStatusLine().getStatusCode() == 307) {
            String newUrl = response.getHeaders("Location")[0].getValue();
            httpPut.setURI(new URI(newUrl));
            response = httpclient.execute(httpPut);
        }
           
        try {
            HttpEntity entity = response.getEntity();
            EntityUtils.consume(entity);
        } finally {
            response.close();
        }
    } finally {
        httpclient.close();
    }
}

Of course I want my code to run at regular intervals, but fortunately I had already figured out how to go about running a Java program every 15 minutes.  It was easy to toss everything into a Docker container and let it do its thing.

Here are a few notes/design decisions that I made when putting things together:

  • There are no changes to the basic functionality of the Nest thermostat.  It is not aware of the external temperature sensor and heats/cools as normal.  This means, even if something goes wrong in my code (or network connection or custom hardware or somewhere else), things can’t go too crazy.
  • My code does not control the length the fan runs–it starts the fan and lets the Nest take care of turning it off.  There is a default run time that can be set on the thermostat–in my case I set it to 15 minutes to match the run duration of my new program.
  • I have a two stage furnace and when just the fan is run it goes at half speed.  Even at full speed the furnace fan is pretty quiet, and at half speed we don’t even notice.
  • The thermostat only gives me the temperature in degree increments (if I were using Celsius it would be in half degree increments).  My homemade temperature sensor goes to greater precision, but it’s hard to say whether that greater precision provides better accuracy.  I went with a 2 degree variance threshold for enabling the fan to allow for rounding differences as well as accuracy differences between upstairs and downstairs temperatures.

As far as I can tell, everything came together smoothly and “just works” and has been for the past few weeks.  Occasionally I check the log to make sure it’s still running.  Once in awhile when I walk past the Nest I notice the fan icon indicating that the fan is running (and I can verify that by putting my hand near a vent).  The weather is still mild, so it will be interesting to see what happens when it gets colder (especially when I rev up the wood stove), but so far there seems less variance in temperature throughout the house.  I love it when a plan comes together . . .

Running a Java program every 15 minutes

I wrote a simple Java program that I wanted to run every 15 minutes.  I decided to wrap everything into a Docker image so that I would get the logging, restart capability, and portability goodness that one gets for free when running a Docker container.  It’s not a difficult thing to do, but it took me longer than it should since I made some incorrect assumptions.

Since I wanted the image to be small, I went with an “Alpine” version of the openjdk image.  My first incorrect assumption was that I could use cron and crontab like I do on Ubuntu or Red Hat systems–but Alpine doesn’t come with cron.  However, it’s actually easier than messing with crontab–I just had to put my script into the /etc/periodic/15min directory.

Once I had the script in place, I tried to run the container, but eventually discovered the the small Alpine image does not have the daemon enabled when the container starts up.  This was solved by running crond in the foreground.  Here’s a Dockerfile showing the important bits:

ROM openjdk:alpine
MAINTAINER Nathan Bak <dockerhub@yellowslicker.com>

# Create directory to store jars and copy jars there
RUN mkdir /jars
COPY jars/*.jar /jars/

# Copy bin directory of project to root directory
COPY bin/ /

# Copy runJavaApp script into correct location and modify permissions
COPY runJavaApp /etc/periodic/15min/
RUN chmod 755 /etc/periodic/15min/runJavaApp

# When the container starts, run crond in foreground and direct the output to stderr
CMD ["crond", "-f", "-d", "8"]

Here is the runJavaApp script:

#!/bin/sh
java -cp /:/jars/commons-codec-1.9.jar:/jars/commons-logging-1.2.jar:/jars/fluent-hc-4.5.2.jar:/jars/httpclient-4.5.2.jar:/jars/httpclient-cache-4.5.2.jar:/jars/httpclient-win-4.5.2.jar:/jars/httpcore-4.4.4.jar:/jars/httpmime-4.5.2.jar:/jars/jna-4.1.0.jar:/jars/jna-platform-4.1.0.jar com.yellowslicker.sample.Client

The “gotchas” I ran into with the script include:

  1. The script must begin with #!/bin/sh (out of habit I tried #!/bin/bash, but Alpine doesn’t come with bash)
  2. Each jar must be listed explicitly (I tried using /:/jars/*.jar for my path, but it didn’t work)

There are a lot of ways to schedule things, but this method was simple (once I figured it out) and I think it is robust.  In my case, it also fits well into the Docker microservice environment I’m running.

Running a Docker container when the machine starts

Normally when I have a Docker container that I want to automatically come up whenever the machine restarts, I simply use –restart=always when running the container (or “restart: always” in a Docker Compose YAML file).  Recently encountered a situation where that didn’t meet my needs.  I thought it would be quick and easy to start the container from a service (a la systemd).  It ended up being easy, but it wasn’t as quick as I thought because I made some incorrect assumptions and sloppy mistakes along the way–so in case I need to do this again I am documenting what I did here . . .

I was using an Ubuntu 16.04 machine and for my example I’m using my Beaverton School District Calendar image.  To create the actual service, I created the file /etc/systemd/system/schoolCal.service with the contents:

[Unit]
Description=School Calendar Service
Requires=docker.service
After=docker.service

[Service]
Restart=always
ExecStart=/etc/systemd/system/schoolCal.sh

[Install]
WantedBy=multi-user.target

There’s nothing special about the service definition, it basically runs the schoolCal.sh script.  The problem I encountered when creating the service file was I forgot to add the dependency on the docker.service (I’m not sure if both “Requires” and “After” need to be set, but at least one of them does).  To enable the service I ran:

sudo systemctl enable schoolCal

Here are the contents of the schoolCal.sh script:

#!/bin/sh
docker pull bakchoy/beavertonschoolcalendar
docker run -i --net host -p 9999:9999 bakchoy/beavertonschoolcalendar

The script is very simple, but it took several tries for me to get it right.  Here are some details I encountered/considered:

  • It’s necessary to make the script executable
  • The explicit pull means that the latest image will always be used when starting up a new container.
  • Since I want the container log to be available via journalctl, the container has to be run in interactive mode “-i” instead of in detached mode.
  • Normally when I run stuff in interactive mode, I use “-i -t”.  When I had that, the script worked fine when I ran it manually, but when invoked by the service it would fail with “the input device is not a TTY”.  It took me awhile to figure out the fix was simply to remove the “-t”.
  • In this case, I wanted the container ip/hostname to be the same as the host, so I set “–net host”.  In most situations that probably isn’t necessary.
  • Space isn’t an issue here and I have a different mechanism for cleaning old containers.  Otherwise I might have added a “-rm” (but I’m not certain it would work as expected).

I found https://docs.docker.com/engine/admin/host_integration/ which also has an example invoking a Docker container via systemd (and upstart), but it seems closer to using a Docker restart policy than what I’m doing.  Although in general I think using the built-in Docker restart policies is a better approach, here are some aspects that differentiate my approach:

  • No specific container tied to the service–a container doesn’t need to exist for things to work when the service is started
  • I pull request can be included to basically provide automatic updates
  • Logging can be directed to the standard service logging mechanism (such as journalctl)
  • The service can be monitored with the same tools for monitoring other services rather than Docker way

My New Toy (Part 2)

In the previous post, I implemented a simple counter with serial output and today I improved it.  The main reason I purchased the ESP8266 module in the first place was to get WiFi for cheap, so I wanted to try out the WiFi capabilities.  The resulting sketch is still a counter, but instead of publishing the count via the serial interface, it connects wirelessly to a database and publishes the count there.

To begin with, I needed a simple database that I could access via HTTP.  Redis is a simple key/value type database, but it doesn’t have an HTTP interface.  I found Webdis “A fast HTTP interface for Redis”.  To set things up quickly, I found that someone had already put everything together and published a Docker image on DockerHub.  So, through the magic of Docker, all I had to do to get Redis and Webdis up and running on my computer was run this magic command:

docker run -d -p 7379:7379 -e LOCAL_REDIS=true anapsix/webdis

I then wrote a sketch that would publish to my new database:

#include <ESP8266WiFi.h>
const char* ssid = "name of wifi network";
const char* pass = "wifi network password";
const char* ip = "192.168.1.35";
const int port = 7379;
int count = 0;

void setup() {
  WiFi.begin(ssid, pass);
  while (WiFi.status() != WL_CONNECTED) {
    delay(1000);
  }
}

void loop() {
  delay(5000);
  WiFiClient client;
  client.connect(ip, port);
  String url = String("/SET/count/") + count++;
  client.print(String("GET ") + url + " HTTP/1.1\r\n" +
               "Host: " + String(ip) + "\r\n" + 
               "Connection: close\r\n" + 
               "Content-Length: 0\r\n" + 
               "\r\n");
}

Basically, it connects to the wifi network (ssid) using the provided password (pass) and then publishes the count to the database (located at ip).  It publishes the new count value every five seconds.

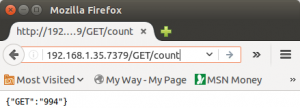
To verify that it was working, I simply plugged this URL into my web browser :

192.168.1.35.7379/GET/count

It returns the current value of count:
getCount

So now I can not only program my new toy, but also use some of its wireless capabilities.  It’s not useful, but it is a good step to learning how to use the ESP8266.

Lighter than Docker

I’ve got four kids attending three different schools. Even though the schools are all in the same district and have the same holidays, each has a slightly different schedule. For example, the middle and high school have “A” and “B” days to designate which classes students should attend that day. The elementary school has days 1 through 8 to identify the daily “special” (PE, music, library, etc.) . Also, each school has different days for conferences, finals, etc. Each school provides a PDF of the school calendar, but that means keeping track of three URLs or printed pages, so I wrote a rest service.

The coding of the rest service was pretty simple and didn’t take too long.  The dataset isn’t very large and is static, so no fancy database was required; just some JSON files containing the information.  It was a good opportunity to practice using Python since that is the current programming language I’m learning on the side.  Since I’m a fan of Docker and the magic it works, I wrapped everything into a Docker image and now anyone can obtain the image from a public repository on Dockerhub.

Running the rest service from a container works great.  After I verified the functionality, I created a container using Amazon’s EC2 Container Service.  The container service was fairly easy to use and everything still worked smoothly.  However, since my 12 months of the Amazon Web Services free tier has long expired, after several hours I had accumulated a debt of $0.22 for only dozens of requests and seconds of computing time.  I’m cheap and don’t like the idea of containers trickling my pennies away while doing very little.  So I decided to try out AWS Lambda.

The first thing I like about AWS Lambda is that it’s cheap: up to 1,000,000 requests and 3,200,000 seconds of computing time per month are free and there is no charge when the code is not running.  It was easy to adapt my code to run as a Lambda function since what I needed was basically a subset of what is in my Docker container.  I just had to provide the functional code and didn’t need to worry about any web server to handle the HTTP communications.  In addition, the Lambda service also automatically provides scalability and high availability.

For my school calendar rest microservice, I think the Lambda implementation has worked out better than my initial Docker solution.  I needed something lightweight and got exactly that.  Here are some of the advantages/disadvantages of Docker vs Lambda:

Docker Lambda
-Portable
-Pretty much any language
-Scaling with Compose/Kubernetes/etc.
-When it’s running, it’s running
-User defined configuration
-Only on AWS
-Java, JS, and Python
-Automatic scaling
-Only runs when needed
-Configuration the AWS Lambda way

What OS for Docker host? (Part 4)

This is a continuation from What OS for Docker host? (Part 3).

discs

TinyCore

Next I tried TinyCore Linux.  I downloaded the 100MB “CorePlus” ISO instead of the minimal 10MB “Core” ISO because CorePlus contains the installer and the extra stuff for wireless.  In “Live” mode I had no problems using the no-frills utility to get the wireless working.  TinyCore has its own package manager with both a GUI and a command line tool called “tce-ab”.  I actually found tce-ab to be easier for new users than yum or apt-get since it is more interactive and prompts you with questions and choices of answers.  I used it to install curl without issue.

I didn’t have any luck installing Docker.  The package manager didn’t seem to know anything about it and the normal Docker script (which I pulled down using curl) crashed and burned without even useful errors like I’ve seen with other distributions.  Since Docker is a key use case, I want it to work and be easy to install and update.  And so I decided that I wouldn’t use TinyCore.

Conclusion

I failed.  I wanted to find a new (for me) operating system for running Docker containers.  Although I wanted something lightweight, while doing through the investigation my key requirements seemed to be:

  1. Docker (easy to install/upgrade to the current version)
  2. Remote access (since the screen is cracked, I just want to interact via SSH)
  3. Wireless support (so I can get the laptop off my disheveled desk)

Of the requirements, it seemed like getting both 1 and 3 together was the tricky part.  Most of the bare bone systems designed to run Docker assume that the machine is “on the cloud” or at least has a wired connection.  If wireless weren’t a requirement, I’d probably go with Rancher OS–I had the best experience with it apart from the wireless problems and I want to continue playing with it some time in the future.

And so I went with Ubuntu 15.10 Desktop since that was the first disc I found for something I knew I could get working.  The install of the fresh OS, wireless configuration, install of an ssh server, and installation of Docker 1.10.2 occurred while I was writing up my TinyCore experience and the above part of the conclusion.  The only “gotcha” was I forgot to change the power settings so that the laptop wouldn’t suspend was the lid was closed, but that was an easy fix.  It now sits on an unused chair in the dining room until my wife kindly suggests I find a “better” place for it.  I can connect to it via SSH and already have a microservice running on it in a Docker container.

So I failed and ended up with what I could have had a week and a half ago, but along the way I did learn about various other Linux distros and as an added bonus now have a bunch of burned discs (mostly unlabeled) to clutter up my disheveled desk.

What OS for Docker host? (Part 3)

This is a continuation from What OS for Docker host? (Part 2).

CoreOS

Reading about my plight and having experienced problems with Docker on Alpine Linux, Jan Hapke recommended CoreOS unless one needs CIFS.  Since I didn’t know anything about CIFS, I assumed I didn’t need it.  So I pulled down another ISO and burned another disc.  The installation process was fairly simple and I’d already learned my lesson about specifying authorized keys at install time during my Rancher OS exploration.  I was a little surprised that the installer didn’t ask me if I really wanted to reformat my hard drive–I knew it would and admittedly did use sudo, but usually for such potentially disastrous consequences most installers ask if you really want to lose all the data on the drive . . .

The install went fairly quickly and I was able to ssh into my machine using my key.  I checked and the Docker version was at 1.8.3–I had installed the “stable” version of CoreOS so it makes sense that it doesn’t have the very latest and greatest.  I ran a few Docker containers and everything worked smoothly and as I would want.

Then came wireless networking setup.  I couldn’t.  Searching a bit found others also wanted to use wireless with CoreOS, but the solution seems to involved manually finding the correct drivers and then reconfiguring and building the kernel. That was something I wasn’t too keen to try.  And so I decided that I wouldn’t use CoreOS.

Snappy

While searching for operating systems to try, I came across a couple articles mentioning Ubuntu Core which is known as “Snappy” and is apparently “designed for Docker”.  Since I still had CoreOS running on the laptop, the install consisted of running:

wget http://releases.ubuntu.com/15.04/ubuntu-15.04-snappy-amd64-generic.img.xz
unxz -c ubuntu-15.04-snappy-amd64-generic.img.xz | sudo dd of=/dev/sdX bs=32M

After that, since I had just run dd over the hard drive, things were understandably in a very bad state, so I forced a restart of the machine. Surprisingly Snappy booted up fine and I was able to SSH into it using the default user name and password (both “ubuntu”).

Installing Docker was pretty easy once I realized that the system didn’t have apt-get.  Using the Snappy way, I ran:

sudo snappy install docker

This gave me version 1.6.2 of Docker.  I tried running “sudo snappy update docker” but it just seemed to update ubuntu-core.  When I went to install Docker directly from docker.io, I discovered that not only does Snappy not come with wget or curl, it doesn’t even seem to have an easy way to install those tools (though some people have found complicated ways to install them).  Since I just wanted to fetch a single file, and had Docker, I mounted a volume, spun up a container, and fetched the Docker install script into the mounted directory.  I then exited the container and tried to run the script.  The script seemed to think that Snappy is like normal Ubuntu and tried to run apt-get.  It failed miserably.  With an ancient version of Docker and difficulty adding the most basic of utilities, I didn’t even want to try taking on the beast that is wireless.  And so I decided that I wouldn’t use Snappy.

I had thought that this post would have two parts, but obviously that didn’t work out.  The story continues (and hopefully finds a happy ending) in part 3.

What OS for Docker host? (Part 2)

This is a continuation from What OS for Docker host? (Part 2) where I tried out Atomic Host and Alpine.

RedHat or Ubuntu

I set up machines to run Docker all the time usually on a RedHat/CentOS or Ubuntu system.  If I had selected either of those, the laptop would be up and running already, but that’s not the real point of this exercise.  I’m interested in learning about alternatives–especially those that will give me Docker goodness and not a lot of stuff I don’t need.  If I couldn’t find anything else, plan B was to fall back to my comfort zone, but that would mean failure.  And so I decided that I wouldn’t use RedHat or Ubuntu.

Puppy

I like Puppy Linux because it runs quickly even on older hardware.  It’s been awhile since I’ve played with it and I found there are now more flavors.  The “Long-Term-Support” releases were pretty old (two or more years) and so I didn’t want those (Docker likes a newer kernel).  So I downloaded a more recent “Slacko Puppy 6.3” which is apparently a Slackware-compatible version of Puppy.  The download and install when fairly smoothly except for some issues getting things setup correctly with GParted.  However, when I tried to install Docker I got an error saying that Docker only supports 64 bit platforms.  I didn’t know that and had grabbed the 32 bit release.

Another download, burn and install later, I had the 64 bit version of Puppy ready to go.  There were three different network configuration tools and the first two didn’t seem to want to set up the wireless for me, but the third one I tried (called “Frisbee”) went quite smoothly.  However, I was unable to SSH into the machine–there was no SSH server installed.  I used the package manager to install OpenSSH.  The first couple attempts failed with no useful error messages.  Eventually it reported success, but I never managed to connect via SSH.

The package manager didn’t seem to know about Docker and I ran into the same problem I had with Alpine when trying to use the Docker installer–the platform isn’t supported.  So I did a manual install of the binary.  Unfortunately, when I tried running the Docker daemon I got errors stating the Docker couldn’t create the default bridge due to problems setting up the ip tables.  And so I decided that I wouldn’t use Puppy Linux.

Rancher OS

With a little searching, I found Rancher OS which is allegedly “the perfect little place to run Docker”.  I found the concept being the OS to be intriguing–apart from a small base which provides footing for Docker to run, all the system services are run in Docker containers.  There are actually two Docker daemons running: one for the system and one for “normal” Docker stuff.

The install process took me a few tries, but admittedly it was user error on my part.  Rancher OS didn’t want to install on the hard drive at first because it was partitioned and mounted and so I had to search around for the magic commands to remedy that.  I then had an install go through, but when I booted up I couldn’t log in–apparently once installed the default user/pass no longer works and you can only connect in via the keys provided during install.  I had provided no key and thus had no way to access the newly install operating system.  Note that this what not the fault of the installation instructions, but rather my failure to read and follow carefully.  Going through a the next time was a smooth process.

With the auth key, I was easily able to ssh into the machine.  I had no problem running various Docker containers.  The OS came with version 1.9.1 of Docker, but I realized I hadn’t installed the latest version of Rancher OS.  The upgrade process was as simple as running:

sudo ros os upgrade

An interesting thing about both the install and upgrade was that most of the process seems to be just pulling down Docker images.  It only took a couple minutes and then apparently the operating system was updated to v0.4.3. When I checked the Docker version again I was pleased to see that it now reported 1.10.1 which is exactly what i wanted.

So now it seemed like the only thing that I was missing was wireless network connectivity.  Wireless, or rather lack there of, is a deal breaker for me, but I had found Rancher OS so interesting that I resorted to something I hate to do.  I asked for help.  Apparently, it is somehow possible to get wireless to work with Rancher OS, but no instructions were immediately forthcoming.  This was rather a bummer to me because I really hoped that Rancher OS would be it for me.  And so I decided that I wouldn’t use Puppy Linux.

The story continues in part 3.